
Ultimate Guide: Roof Flashing Installation to Prevent Costly Leaks
Did you know that improper roof flashing is responsible for over 60% of roof leaks? Your home's vulnerable areas - like chimneys, skylights, and roof valleys - are constantly under assault from rain, snow, and wind. Without proper flashing protection, these areas become prime targets for water damage that can cost thousands in repairs.
Roof flashing serves as your home's critical defense system, directing water away from these vulnerable spots where different roof planes meet or where objects penetrate the roof surface. Yet many homeowners overlook this essential component during routine maintenance, leading to preventable water damage and costly repairs that typically range from $200 to $1,000 or more.
In this comprehensive guide, you'll discover everything you need to know about roof flashing - from identifying common problem areas to maintenance best practices that can save you thousands in repairs. We'll explore the different types of flashing materials, proper installation techniques, and warning signs that indicate potential issues. Whether you're a new homeowner or maintaining an older property, this information will help you protect your investment and prevent water damage.
- Understanding Roof Flashing
- Vulnerable Areas Requiring Flashing
- The Importance of Proper Installation
- Signs of Flashing Problems
- Maintenance and Repair Tips
Understanding Roof Flashing
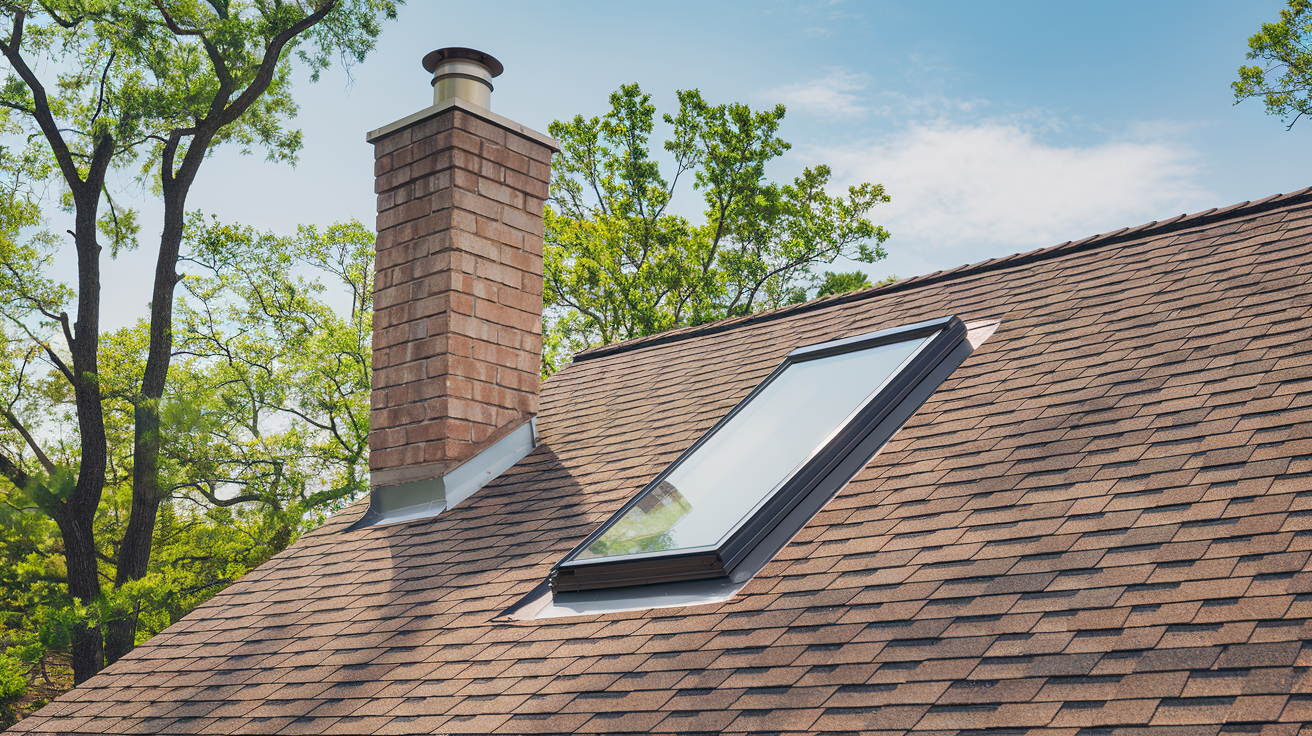
Roof flashing is crucial for any roofing system, as it prevents water leaks in vulnerable areas such as chimneys, skylights, and roof valleys. These areas, where the roof plane is interrupted or changes direction, create potential entry points for water. For example, a chimney creates a gap where it protrudes through the roof, allowing water to seep in. Skylights and valleys also create seams where leaks can occur. Flashing, usually made of thin metal like aluminum or copper, is installed to direct water away from these critical joints and seams. Think of flashing like caulking around a bathtub, but for your roof. It seals gaps and prevents water from seeping in. Despite its importance, flashing is often overlooked during roof inspections, leading to water damage if not properly maintained. Understanding flashing helps homeowners keep their roofs watertight and durable. Consider getting a roof assessment to ensure your flashing is in good condition.
What is Roof Flashing?
Roof flashing acts as a waterproof barrier placed between different sections of a roof, especially where two surfaces meet, such as where the roof and chimney connect. Its main job is to channel water away from these joints, preventing water from getting in and causing damage. Flashing is layered and overlapped, creating a shingle-like effect. Water runs down the roof and away from vulnerable areas. Step flashing, for example, is installed around a chimney and overlaps both the shingles and the chimney to create a watertight seal. Flashing is used in various roof areas, including valleys, dormers, and roof penetrations like vents and chimneys. Proper installation is essential, as improper flashing is a leading cause of roof leaks. It can cause several problems, including water stains on your ceiling or walls, peeling paint, and even attic mold. Several factors can cause improper installation, such as incorrect overlapping, unsealed seams, or using the wrong type of flashing. To learn more about roof maintenance, visit our website.
Common Roof Flashing Locations
- Chimneys
- Skylights
- Roof Valleys
- Vents
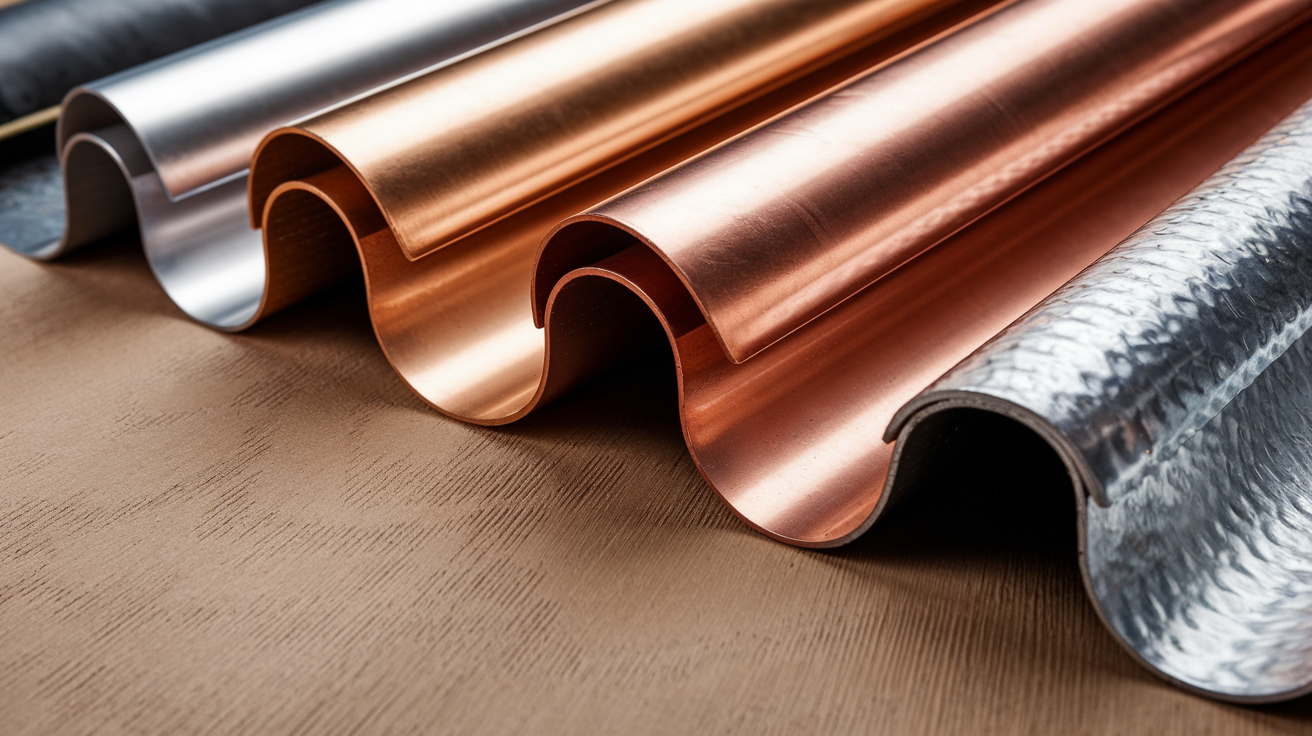
Common Materials Used in Roof Flashing
Several materials are used for roof flashing, each with pros and cons:
- Aluminum: Lightweight and corrosion-resistant, making it suitable for most homes.
- Copper: More expensive but very durable and visually appealing, often lasting longer than the roofing material.
- Galvanized Steel: Strong and affordable but can rust over time if not properly coated.
The right material depends on several factors, including your budget, roof type, and local weather. If you see missing or rusting flashing, contact a roofing contractor for an inspection. Flashing costs $15 to $25 per linear foot, with repairs usually costing $200 to $500 and full replacements costing $400 to $1,000, depending on the repair size and materials used.
Vulnerable Areas Requiring Flashing
Flashing is crucial for protecting a roof from water damage, acting as a waterproof barrier around chimneys, vents, skylights, dormers, valleys, and edges. Understanding these vulnerable areas helps homeowners protect their investment.
Chimneys and Roof Vents
Chimneys and roof vents are common entry points for water if flashing isn't properly installed. The flashing creates a watertight seal, directing water away from these vulnerable spots.
Chimney Flashing
Chimneys are particularly susceptible to leaks due to their complex structure and the use of porous materials like brick and mortar. These materials can absorb water, leading to leaks around the counter flashing. Moisture near the chimney's base is a clear sign of a potential flashing leak. Other indicators include water stains on ceilings and rusting or loose flashing. Leaks often result from improper installation, weather damage, or deterioration over time. To check for leaks, start by inspecting the attic and ceiling for water stains or discoloration. Also, examine the chimney's exterior for signs of rust or damage. A roof assessment can help identify potential issues early.
Checklist for Identifying Chimney Flashing Issues
- Inspect for water stains on ceilings
- Check for rust or loose flashing
- Look for moisture near the chimney base
Roof Vent Flashing
Roof vent flashing must be properly fitted to the vent's shape to ensure water is directed away from the opening. Regular inspection, especially during heavy rain or snow, is essential to identify potential problems early.
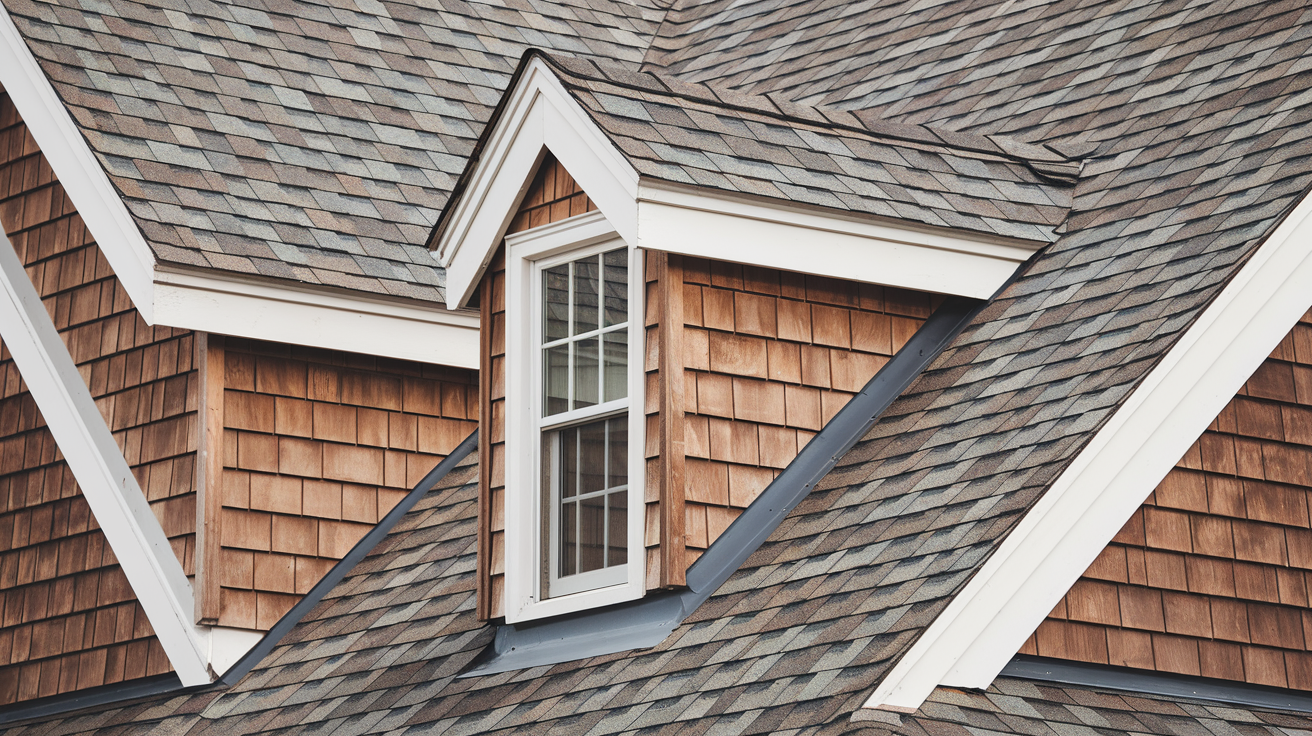
Skylights and Dormers
Skylights and dormers enhance a home's appearance and functionality but require specialized flashing.
Skylight Flashing
Skylights, essentially windows in the roof, need precise flashing to prevent leaks. The flashing must also allow for expansion and contraction due to temperature changes, maintaining a watertight seal.
Dormer Flashing
Dormers protrude from the roof and require flashing at every seam and joint, including where the dormer walls meet the roof and around any windows or openings. Proper flashing ensures water is channeled away from the building.
Roof Valleys and Edges
Roof valleys and edges are highly vulnerable to water damage due to converging roof planes and water flow.
Roof Valley Flashing
Valleys are prone to water accumulation, making proper flashing crucial to prevent water from seeping into the roof deck and causing damage. Flashing failure in valleys can lead to leaks, rot, and costly repairs.
Roof Edge Flashing
Edges, like gable ends and eaves, need flashing to protect against wind-driven rain and ice dams. Ice dams can force water under shingles, highlighting the importance of proper flashing. Regular inspection and maintenance of flashing in these areas are key to extending the roof's lifespan. To learn more about roof maintenance, visit our website.
The Importance of Proper Installation
Proper roof flashing installation is crucial for protecting your home from water damage and preserving its structural integrity. Roof flashing, typically made of metal, safeguards vulnerable areas like chimneys, skylights, and vents by directing water away from them. These areas, where the roof plane changes or is interrupted, are particularly susceptible to leaks. Precise installation is essential to ensure the flashing acts as an effective barrier against water intrusion. Incorrect installation can lead to leaks, roof deterioration, and even structural damage. For instance, improperly installed flashing around a chimney can cause water damage inside the adjacent walls when water seeps through improperly sealed flashing. Consider getting a roof assessment to identify potential flashing issues.
Preventing Water Leaks
One of the main purposes of roof flashing is to prevent water leaks, which can cause significant damage to your home's interior. Signs of water leaks can include water stains on ceilings or walls near the roofline, peeling paint, or mold growth in the attic. Improper flashing installation is a leading cause of water infiltration, creating gaps that allow moisture to enter the roof structure. Specifically, if flashing isn't properly overlapped or sealed, water can penetrate, leading to mold, wood rot, and insulation damage, resulting in costly repairs. These repairs can range from $200 to $500 for minor fixes around vents, skylights, or chimneys, to $400 to $1,000 for complete flashing replacement. Correct flashing installation protects your home from these hazards and avoids expensive repairs. To learn more about roof maintenance and prevent leaks, visit our website.
Extending Roof Longevity
Proper roof flashing installation not only prevents immediate problems but also extends the life of your roof. A well-installed flashing system effectively diverts water, minimizing wear and tear on roofing materials and increasing their lifespan. This is especially important in areas with harsh weather, where roofs face frequent rain, snow, or wind. Flashing is crucial in climates with freezing temperatures, heavy snowfall, or frequent rainfall. Professional installation maximizes roof durability and postpones costly replacements. Durable materials like copper or lead, when properly installed, can last over 50 years, often exceeding the lifespan of the roofing material itself. Other materials, with proper installation and maintenance, also offer effective protection.
Common Installation Mistakes and How to Avoid Them
Despite its importance, common mistakes often occur during flashing installation, reducing its effectiveness. One frequent error is improper sealing, leaving gaps for water to enter. This can happen if sealants are applied incorrectly or if the wrong type is used. Using an incompatible sealant can lead to premature failure. Another mistake is using inadequate materials that can't withstand the local climate, leading to early deterioration. For example, using thin metal in coastal areas with high salt content can accelerate corrosion. To avoid these issues, hire experienced professionals who understand flashing installation. They ensure secure attachment, proper sealing, and durable, climate-appropriate materials. This includes following industry best practices, like ensuring a minimum flashing height of 8 inches, which some manufacturers exceed with 9- or 10-inch options for added protection. Taller options offer extra protection in areas with heavy snow or rainfall. In conclusion, proper roof flashing installation is essential for protecting your home from water damage and extending your roof's life. Correctly installed flashing prevents leaks, ensures durability, and provides peace of mind, saving you from unexpected repair costs. Prioritize professional installation to avoid common mistakes and maintain a sound roofing system.
Signs of Flashing Problems
Roof flashing is essential for protecting your home from water damage. It's typically a thin metal layer installed in vulnerable areas like valleys, chimneys, skylights, and vents. Flashing safeguards these intersections and protrusions where water can easily seep in. However, failing flashing can cause significant problems, including leaks and structural damage. Understanding the signs of flashing problems helps homeowners address issues early and avoid costly repairs. Improper installation is a leading cause of flashing failure, often occurring during gutter and flashing installation. Incorrect overlaps or insufficient sealant create weak points where water penetrates. This section explains common flashing issues, visual cues, and when professional help is necessary. Consider scheduling a roof assessment to identify potential flashing problems early.
Identifying Common Issues
Several issues compromise roof flashing effectiveness. Improper installation, especially around chimneys and vents, is a primary concern. Incorrect flashing around vertical-to-horizontal transitions is also common. These areas need careful sealing to prevent water from flowing under the roofing. Corrosion of metal flashing and sealant deterioration also cause leaks. Weather exposure causes rust and cracks, creating openings for water. Missing or damaged flashing pieces are another vulnerability. Even small holes, bends, cracks, or missing sections allow water under shingles, often due to weather, debris, or animals.
Visual Cues for Homeowners
Homeowners can spot potential flashing problems by looking for specific visual cues:
- Water stains on ceilings or walls near the roofline often indicate flashing leaks. Examining nearby flashing helps pinpoint the source. For example, a ceiling stain near a chimney likely points to chimney flashing issues.
- Peeling paint or mold in the attic also signals moisture problems from faulty flashing. These signs require prompt attention.
- Rust, corrosion, loose, or bent flashing pieces are additional visual indicators.
For chimneys, check for rust, loose, or damaged flashing around the exterior. Look where the flashing meets the brick, roof, or other flashing components. Regular inspections help detect issues early. To learn more about roof maintenance, visit our comprehensive guide.
Visual Cues for Flashing Problems
- Water stains on ceilings or walls
- Peeling paint or mold in the attic
- Rust, corrosion, loose, or bent flashing
When to Call a Professional
While some flashing problems seem minor, professional help is often necessary. Contact a roofing expert for an inspection if you notice missing, rusting, or deteriorating flashing. For flat roofs with missing or rusting flashing, contact a flat roofing contractor. Flat roofs require specialized flashing techniques. Professionals assess the damage and recommend repairs or replacements. Repairs typically cost $200–$500 for skylights, chimneys, and vents, while full replacement ranges from $400–$1,000. Costs vary based on job complexity and materials. Ignoring flashing problems leads to severe issues like structural damage and higher repair costs. Consult a professional if you're unsure.
Maintenance and Repair Tips
Proper maintenance and repair of roof flashing, especially around vulnerable areas like chimneys, are crucial for preventing leaks and ensuring your home remains dry and secure. By following a regular inspection routine and understanding when to undertake repairs, homeowners can effectively mitigate potential water damage and extend the lifespan of their roof. This section provides comprehensive guidelines on how to maintain and repair roof flashing, considering regional weather factors and financial implications.
Regular Inspection Guidelines
Regular inspections are essential for identifying potential flashing issues before they escalate into major problems. Homeowners should inspect their flashing at least twice a year, ideally in spring and fall, to catch any seasonal damage.
What to Look For
During inspections, focus on key indicators of potential problems:
- Rust: Signals corrosion and weakening of the metal.
- Loose Flashing: Pulling away from the chimney or roof is a significant concern.
- Missing Components: Allows water to penetrate the roof.
- Small Holes: Even tiny holes can lead to leaks.
- Bends, Cracks, or Corrosion: Indicate compromised flashing integrity.
Use binoculars to safely inspect from the ground or consider a professional assessment. Professionals can pinpoint issues like improper installation or sealant deterioration. Addressing minor issues promptly prevents costlier repairs later. For instance, treating a small rust spot early can avoid a full flashing replacement. If you notice rust or missing flashing, schedule a professional inspection with a roofing contractor. Consider scheduling a roof assessment for a comprehensive evaluation.
Regional Considerations for Maintenance
Different regions experience varying weather patterns, impacting flashing wear and tear.
High-Moisture Areas
In areas with heavy rainfall or snow, like the Pacific Northwest or Northeast, more frequent inspections and maintenance are necessary due to increased moisture exposure. This moisture accelerates rust and corrosion, leading to premature failure.
High-Heat Areas
Regions with extreme heat, such as the Southwest, may experience faster deterioration due to thermal expansion and contraction. This constant fluctuation weakens the metal, increasing susceptibility to cracking. Repeated expansion and contraction can cause stress fractures, eventually leading to leaks.
Coastal Areas
Coastal homeowners face increased corrosion from salty air, requiring more frequent inspection and cleaning.
Freezing Temperatures
In areas with freezing temperatures, ice dams can damage flashing, requiring extra attention during winter inspections. To learn more about roof maintenance, understand how different climates impact your roof. Tailoring your maintenance schedule to your climate extends flashing lifespan.
DIY vs. Professional Repairs
Choosing between DIY and professional repairs depends on the damage complexity and your DIY comfort level.
DIY Repairs
Minor repairs, like resealing small leaks with roofing cement or replacing a single piece of flashing, are often manageable for homeowners with basic tools and safety precautions. Prioritize safety and use fall protection equipment when working on your roof.
Professional Repairs
Extensive repairs, especially those involving structural issues or significant rust, should be handled by professionals. They possess the expertise and tools to address complex problems like improperly installed flashing or worn-down flashing. Professional repairs provide peace of mind with warranties and expert maintenance advice. If you're uncomfortable with heights, hiring a professional is always the safest option.
Cost Implications of Repairs and Replacement
Understanding repair and replacement costs is essential for budgeting.
Minor Repairs
Minor repairs typically cost $200–$500, depending on the damage. This might include patching small holes or resealing loose flashing.
Full Replacement
Completely replacing flashing ranges from $400–$1,000. Chimney flashing replacement specifically costs $400–$1,600, averaging $1,000. Costs depend on the flashing material (copper is more expensive than aluminum or galvanized steel), installation complexity, and regional labor rates. Repairing existing flashing may cost $300–$800.
| Repair Type | Cost Range | Average Cost |
|---|---|---|
| Minor Repairs | $200 - $500 | $350 |
| Full Replacement | $400 - $1,000 | $700 |
| Chimney Flashing Replacement | $400 - $1,600 | $1,000 |
Repair vs. Replacement
If the damage is extensive or the flashing is nearing its lifespan (15–50 years, depending on material and conditions), replacement is often more cost-effective long-term. Investing in quality materials and regular maintenance reduces repair frequency and costs. For example, high-quality sealant can prevent leaks and extend flashing life. Chimney repairs, including flashing, range from $200–$700 for minor issues to $3,500 for major repairs.
Disclaimer: This blog post is intended for informational purposes only and should not be considered professional roofing advice. Always consult with qualified roofing contractors and insurance professionals for specific guidance regarding your individual circumstances.